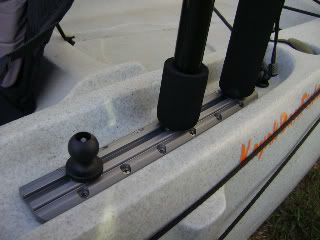
Placing the Gear Trac on your kayak will allow unlimited mounting options. Placing Yak Attack’s screwball to the Gear Trac opens unlimited mounting options with ram mounts utilizing a ball mount.


Or by choosing the Mighty Mount system adapter, Scotty bases can be attached so that all Scotty brand mounts may be used. Not only can they be mounted to the Gear Trac in one place, they can quickly be loosened and slid along the length of the trac allowing them to be secured to any place on the trac.
My 12” trac will be used to secure a Visi-Carbon Pro and a Panfish to mount my camera. It will allow me to mount the Visi Carbon pro light at the rear of the gear track and still give me plenty of room to mount the panfish. The panfish will be mounted to gain a vantage behind the shoulder shot to record videos. I will also be able to mount the smaller panfish portrait to get those low to the water shots. For the kayaker that wants to record himself/herself on video, the ability to place cameras in different places on the kayak by simply sliding it into and out of the trac is going to be a great feature.

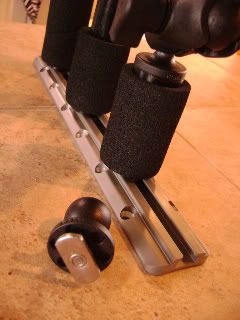
To secure it to the kayak with screws is a great way to use the Gear Trac. However, it certainly lends it’s self for unlimited options. In my case I wanted my Panfish portrait to be mounted next to my fish finder. This would allow me to get a great vantage point for my “grip and grin” shots while keeping me from drill more holes in my kayak. To allow more mobility with my fish finder and camera I mounted the trac on a double ball socket arm which attaches to a 1” ball mounted on my kayak. My camera and FF can now be moved together or independently to get angle I might wish.


I made a video of the installation of the Gear Trac. I however had technical difficulties with one of the cameras.(I forgot to put a sd card in the forward facing camera) Anyway, I ended up with only one “overhead” view.
I also thought a short video to show the whole set up might be helpful.
In conclusion I think Yak Attack has hit another home run with the release of the Gear Trac. The amount mounting options are limited only to your imagination.
For a list of distributors and more information about the new Gear Trac and other products they sell can be found at
www.YakAttack.us
Shaun Russell
Russell.shaun@ymail.com
Well, you've made me rethink my kayak rig! I'm going to have to check out the Gear Trac for sure. I have an Outback and putting that track in that back groove...it's as though it was supposed to be there! Thanks
ReplyDeleteThe Gear Trac does a awesome job. That back grove was a perfect place for it to sit. It's almost like Hobie put it there for that reason. When the kayak was down rigged nothing was left above the groove to get hung up on.
ReplyDelete